School Grounds in a Box: Modelmaking and Design
By Ann Coffey
Thinking of transforming your school grounds but having trouble knowing where to start? Feeling intimidated by the site plan? Then why not try making a large model?
Most people are visual learners and have trouble translating a two-dimensional site plan into a three-dimensional space and vice versa. Making a large, three-dimensional model of your school grounds will enable you to visualize the project as you develop a plan for the site. A model will also make it easy to explore and evaluate the various options you are considering. By making movable to-scale replicas of components such as fences, pathways, and plantings, you can determine the best placement of the various elements you have in mind, avoiding pitfalls such as placing conflicting activities side by side, obstructing sight lines, and locating projects across “desire lines” (non-designated pathways that people choose to use to get from one place to another).
A model can be invaluable in generating excitement for the project among the school community, in gaining the support of school board planners, and in raising funds. Integrating model-making into the curriculum intimately connects children with every part of their school grounds and helps generate a sense of ownership in the project. Students of all ages love building the various components and experimenting with locating them in different places. And through this engaging, creative play, all participants in a project are able to share their ideas and visually consider how to adapt these ideas to the conditions, constraints and uses of the site.
Gathering data
The first step in creating a model is to determine the “as is” characteristics of your school grounds. This includes checking the accuracy of dimensions on the school’s site plan and surveying the present conditions, features, and uses of the grounds. A site survey is conducted to identify and measure existing features such as vegetation, fences, and playing fields; to assess site conditions such as drainage, wind patterns, graffiti, and litter; and to determine the various uses of the grounds by school and community. It is helpful to record this information directly on the school’s site plan (usually obtainable from the school board).
A biodiversity inventory, ideally conducted over the course of a year, identifies the plants and wildlife that already inhabit or visit the site. Students can make a biodiversity map showing where and when the species identified were found and then use this information as baseline data for monitoring changes in biodiversity through subsequent years.
A shade audit helps in determining where additional shade is needed on the grounds. The areas of shade should be measured early in the morning, at noon, and at the end of the day at intervals throughout the year. Repeating the audit annually will enable you to monitor the increase in shade over time as the result of planting trees, growing vines on fences, and constructing shelters such as gazebos.
Involving students in surveying the site is a good way to begin to integrate school grounds transformation into the curriculum. For example, students can record and compare data, observe seasonal changes, identify plants and animals, measure buildings and fences, estimate the height of trees, calculate the area of the grounds covered by buildings, paving, grass and natural spaces, and measure the area of shade cast by buildings and trees at different times of the day throughout the year. The greater students’ involvement during this initial planning stage, the greater their sense of ownership as the project evolves.
Building the model
Determining scale
A school grounds model need not be as precise as the site plan; however, keep in mind that details on the three-dimensional model will eventually need to be transferred to the two-dimensional site plan for presentation to the school board. The transfer of data will be simpler if the dimensions of the various components of the model are as accurate as possible and on a scale that is easy to work with. For example, if the site plan measures 2′ x 2′ 6″ and the model is made exactly five times larger (10′ x 12′ 6″), measurements taken from the site plan will be multiplied by five and those from the model will be divided by five.
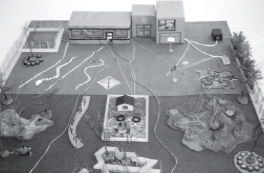
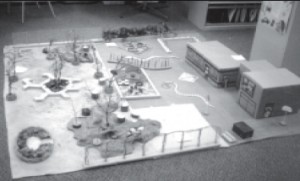
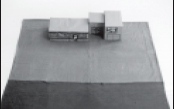
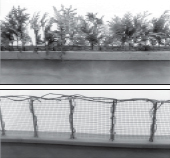
Before: A bare “as is” model of
the school building, pavement
and playing field. After: With
plantings, play structures and
pavement games in place, it is
easy to check sight lines, shade
patterns and the compatibility of
adjacent activities.
Assembling materials
Once you have surveyed and measured the components of the site, the model can be made easily and cheaply using scrap and “found” materials. The following are suggestions for representing the existing features and surfaces of the grounds and for building to-scale maquettes (small models, mock-ups, or three-dimensional sketches) of proposed projects:
– Cut cardboard boxes to size to form the buildings. Draw doorways and windows
and mark spaces where murals can be added.
– Use gray fabric or carpeting to represent paved areas such as playgrounds, pathways, parking lots, and fire lanes.
– Paint existing pavement games such as hopscotch and four square directly onto
the gray fabric. If plans involve removing, relocating or adding games such as a
chess board or number snakes, paint them on separate scraps of fabric so they can
be tried out in different locations.
– Use green fabric or carpeting for sports fields and other grassed spaces. Indicate
bare patches with earth-colored material.
– Make fences by drilling holes in lengths of 1″ x 2″ lumber and gluing short
sections of dowel into the holes. Attach wire mesh to the fence posts to represent
chain-link fences. Ensure that the distance between posts and the height of the fencing is scaled in accordance with measurements taken during the site survey.
– Make models of trees and other plants using dead or unwanted branches from trees and shrubs and setting them in a base of plaster or plasticene.
– Lay colored string on the grounds of the model to mark routes used by pedestrians and cyclists. Use string of a contrasting color to mark routes for vehicles. Model-builders can have fun using their imagination to add foliage to vegetation and to make miniature play structures, basketball poles, bike racks, storage sheds, dumpsters, and seating.
Marking the grounds of the model
To identify the best areas for your projects, it is useful to transfer the following information from your site surveys to the model:
Green fences: Cedar cuttings
model a natural screen along a
fenceline; grapevines transform a
chain-link fence with seasonal
greenery and food for birds.
– utilities infrastructure and the area around each installation that must remain accessible for repair and maintenance work
– areas where snow is piled in winter
– access routes and turning-space allowances for maintenance, emergency, delivery, and waste-collection vehicles
– routes used by pedestrians and cyclists to enter and exit the grounds and buildings, and routes between the building and various destinations on the grounds such as play structures, sports fields, bike racks, dumpsters, storage sheds, portable classrooms, outdoor seating, parking spaces, and bus stops
– problem areas such as poor drainage, steep slopes, diseased trees, windy spots, places where litter collects, undesirable site uses, graffiti, and damaged fences and signs
– off-limits areas
– sight lines that must be retained for supervision
– wildlife observed on the site, both seasonally and year-round
– various uses of the grounds by the school and community, as well as comments by students, parents or teachers
Write short notes and comments on paper and attach them directly to the model or mark important spots with numbers or letters and make an annotated key. Take photographs of unsightly views that you wish to improve upon as well as the more attractive views you would like to preserve. Place them within the model or around the property boundaries to serve as a reminder.
Redesigning the grounds
Once the model of the existing site has been constructed, add to-scale maquettes of proposed projects. Determine the best location for new projects by placing them within the grounds of the model and checking to make sure that:
– projects are not placed across “desire lines”
– shade from trees will fall where it is needed
– sight lines from the street, from important vantage points across the yard, and from the building are not obstructed
– incompatible activities and uses are not placed side by side (children playing on a paved basketball court can slip and hurt themselves on pea gravel kicked from under an adjacent swing set)
Vegetation
In addition to constructing to-scale models of existing trees and shrubs, make models of proposed trees to show the height and spread at the time of planting as well as the size they are expected to attain at maturity. Positioning these trees in different locations on the model will help you decide where to plant them and ensure that sufficient space is allotted for growth.
Knowing how people and vehicles traverse the site helps to avoid problems that may arise from planting trees, shrubs and gardens on “desire lines” or in areas where vegetation may suffer mechanical damage from vehicles. If it is not possible to avoid planting across a well-used route, anticipate that people will tend to walk across the new planting rather than around it and design a clearly-marked pathway to guide them through the space. Create pathways that are interesting to follow: for example, use stepping stones, concrete shapes with animal paw prints, or boards with carvings of words or symbols.
Seating
Place maquettes of various types of seating in different configurations on the model. Remember that children are much more interested in having pleasant places to sit in than simply nice things to sit on. Design seating arrangements according to the play activities that children engage in and consider installing enough seating to accommodate an entire class during outdoor studies.
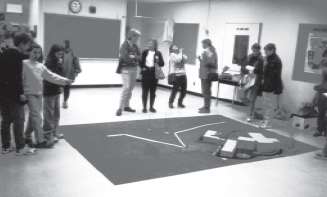
A model provides a focal point
during information sessions with
parents and community members.
Sight lines
Safety is one of the main concerns of school boards, parents and neighbors. To ensure that your design does not compromise visual supervision of the grounds, check that new projects do not obstruct important sight lines. You can do this easily by lying down on the ground to get a worm’s eye view from different points on the model.
Shade
Once you have positioned the maquettes of trees, gazebos and other projects on the grounds of the model, move spotlights across the model from east to west to simulate the sun’s path throughout the day to ensure that shade will fall where it is needed.
Displaying and storing the model
Find a space in the school where the model can remain set up while it is being built. It can be used for class discussions and information sessions with parent and community groups. As the potential for greening the grounds becomes visible, the model will generate and maintain excitement which will help to keep work on the project moving ahead. Where space is limited, photographs of the model can be displayed instead.
Although a model takes up a lot of floor space, you can easily roll up the fabric or carpet base and store it in a box along with the maquettes of your proposed projects. This makes it easy to transport the model should you need to display it off-site when seeking approval or funding for your project.
School grounds design checklist
Check the following to make sure that you are redesigning the grounds according
to site conditions and the needs of the school community.
Division of space: Does your plan reflect the play and social needs of children, and have you divided the space equitably between grade levels?
Reducing congestion: Have you considered how congestion around play equipment can be reduced by increasing the appeal of open spaces that are currently little used or by designing a trail of activities to give more children more play opportunities?
Scale: Have you observed children at play and planned to create spaces that are child-scale to increase the sense of comfort and security?
Sense of place: Have you created spaces that help develop in children a sense of attachment to a place? These are places where children can learn about nature on their own by observing, listening, smelling, touching, watching bugs, exploring the soil, collecting plant debris, finding feathers, etc.
Variety: Are you making the grounds more interesting and providing children with a range of play, social, and learning opportunities?
Compatibility: Have you ensured that adjacent play or social spaces are compatible with one another? How will new or existing activities affect new or existing planted areas?
Comfort: Have you considered how to make the schoolyard more comfortable by creating windbreaks, shade, and quiet spaces where children can get away from noisy, boisterous play?
Siblings and friends: If your yard is segregated by grade, have you considered creating special meeting places where siblings and friends in different grades can play and socialize together?
Visual appeal: Have you included ways to make the schoolyard more colorful year round by adding murals, pavement paintings, etc.?
Fences: How have you addressed the need to reduce the prison-like aspect of metal fencing? Have you planned to green up fencing or to plant vegetation to screen unsightly views from the schoolyard?
Wildlife: Have you ensured that wildlife habitat projects are not placed next to active sports areas where they can be damaged by stray balls and children running?
Seating: Have you placed seating out of the way of ball games and other activities? Are the shapes and arrangements of seats appropriate for their uses by children?
Paving: Have you ensured that loose materials such as sand, wood chips, and gravel in play spaces and plantings will not spill over onto paved areas and cause children to slip and fall?
Garbage: Have you planned to reduce lunchtime garbage and regularly pick up litter that blows into the yard?
Vandalism: Have you planned how you will respond to vandalism of your projects?
Drainage: Have you assessed how the flow of rainwater or meltwater will be affected by new projects? Have you planned to include shallow swales to interrupt the flow of water and direct it towards rather than away from new plantings?
All seasons: Have you visualized what your school grounds will look like during the winter months and how your greening projects will be both used and protected? Have you included winter habitat for wildlife?
Ann Coffey is the Coordinator of the School Grounds Transformation Programme at the Canadian Biodiversity Institute in Ottawa, Ontario. School Grounds in a Box is a trademarked program of the institute.
From Greening School Grounds. To read more:
Greening School Grounds
Leave a Reply
You must be logged in to post a comment.