Camera Trapping

To view the photo-rich magazine version, click here.
Originally appears in the Winter 2022 issue.
By Cate Rigoulot
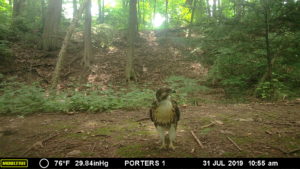
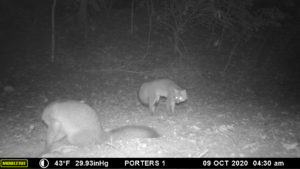
My heart skipped a beat as I plugged the memory card into the reader while my students stared at the projector screen in wide-eyed anticipation. As the images began to load, my fears of setting up the camera incorrectly — or worse, forgetting to turn it on — quickly switched to excitement. My students (high schoolers, that is) let out audible “oohs” and “ahhs” as we made our way through the images. In just one week, we had captured images of raccoons, opossums, deer, foxes, and even a bobcat! After this first experience, I was hooked, and camera trapping became a passion project of mine. With every new camera deployment, I became more comfortable and confident, refining my methods and camera settings. It didn’t take long for me to see the potential that camera traps hold for bringing inquiry into the classroom. Five years (and over 40,000 photos) later, the “camera trap lab” in ninth-grade Environmental Lab Science has become a yearly rite of passage connecting a new set of students to the wildlife around campus. Here I will share some of the lessons I have learned in hopes that they will spark others to integrate this technology into their curricula at all ages.
What is a camera trap?
The first camera traps were self-made rigs that were complicated to set up and expensive. Ecologists would place regular cameras in weatherproof housings and use a trip line that would trigger the camera to take a picture as an animal walked by. They would have to guess the best camera settings and hope that pictures would come out usable. Thankfully, rapid technological advancements have made camera trapping easier and more accessible than ever before. Today, camera traps (also referred to as trail cameras or game cameras) are all-in-one cameras that take pictures of wildlife when triggered by motion and heat. While there are a few user-input settings, the cameras are remarkably easy to use and offer high-quality pictures. For these reasons, camera trapping has become an invaluable tool for ecological research ranging from estimating population density to assessing biodiversity and conducting behavioral studies. [1] Because of the relative ease of setting up and obtaining data from camera traps, they are also excellent for bringing hands-on, real-world applications into the science classroom.
MOULTRIE DIGITAL GAME CAMERA
Selecting a camera trap
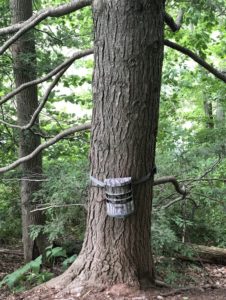
Although new technology has made camera trapping more accessible, it also means that there is a dizzying array of cameras available on the market. While this may seem overwhelming, it’s easy to narrow down the field. The first thing to consider is your budget. A good-quality camera will run in the range of $100–$150. Some newer models now have a small solar panel array or can stream pictures directly to your smartphone through cellular networks, but these features are more a luxury than a necessity, and their prices are reflected as such ($300+). If you are looking to spend less, you can easily find deals on previous year’s models, all of which would be sufficient for classroom use. In addition to the cost of the camera, you will also need to purchase a memory card and reader, batteries, and possibly a security lockbox. I use a 32-GB SD card in my cameras and have found this to hold more than enough pictures. A card of this size costs $10–$15. If your computer does not have a built-in memory-card reader, you will need one for downloading pictures to your computer. A dongle with a memory-card reader should cost around $15. I like to have two memory cards per camera to simply switch the memory cards instead of pulling the whole camera down to retrieve photos. The number of batteries required depends on which camera you purchase. I recommend using long-lasting lithium batteries. In my cameras, I have gotten upwards of six months of continuous use with these types of batteries. Rechargeable nickel-metal hydride (NiMH) batteries may be a more eco-friendly alternative, but may not provide enough voltage for peak camera performance. I budget about $40 a year for batteries per camera. (The cameras I use take 12 AA batteries; many take fewer.) The last cost consideration is whether you will need a lock or security box for your camera. If you plan on deploying it in an area that is frequented by people, it is best to secure your camera to prevent theft. I use a cable lock with a lockbox to protect the camera from the elements and theft. The combination of the lockbox and lock should cost around $50.
After budget, other considerations are the type of flash and picture/video settings. There are three types of flash: white, low-glow infrared (IR), and no-glow IR. The benefit of cameras with a white flash is that they produce color pictures at night, while both infrared options will give you black-and-white night shots. The disadvantage of white-flash cameras is that they are very intrusive and can frighten wildlife (or people). The flash is the equivalent (or brighter) of a flash on a regular camera — I’m sure you can imagine this might be disturbing to many animals. Low-glow IR cameras use a red-light flash to take night photos. While this is less intrusive than white-flash, it may still be detected by your subjects. No-glow IR cameras are also known as invisible-flash cameras and are the least disruptive option. I use no-glow myself, and I have found that it has little impact on the behavior of the animals. The disadvantage of both types of IR cameras is that the black-and-white images can make it more difficult to identify the animals, especially if the animals are moving quickly through the frame.
The final considerations are the types of picture and video settings available on the camera. Most cameras can take both pictures and videos, and some can take both at the same time. If you plan on looking at animal behaviors, a camera that takes videos is helpful. If you are just looking to identify different species, pictures alone would likely be okay. Other settings include the length of the video, adjustable delay, and time between captures.
 Setting up the camera
You’ve finally settled on a camera; you have a memory card and all other accessories in hand — now what?! Before starting with students, it is a good idea to scout some possible locations to set up the camera. Be sure to pay attention to property borders and get the permission of the landowner if necessary. Informing school security of your plans is also a good idea if you want to avoid awkward email exchanges (been there!). In the past, I have worked with a local land trust that permitted me to deploy camera traps on one of their properties as part of a student’s independent study. Typically, I set up the cameras on a path that runs along the Farmington River behind our school. If you don’t have an area like this close by, don’t fret! You’d be surprised just how many animals pass through seemingly “developed” areas. You may get quite a bit of variety by finding a place on campus that is less frequented by people. If you can find a feature like a path or a log, directing the camera along one of these may yield greater results, as they have been shown to have increased animal activities. [2] When you have found a suitable location, it is time to mount the camera. Cameras should be mounted on a sturdy object such as a tree or pole about 0.5–0.75 meters off the ground. Once you have found a location, I suggest a trial run (or two) to make sure that you are comfortable with your camera settings before involving your students. Things will go much smoother if you know which settings work best for you and your camera.
Applications for the classroom
In 2002, Blamford et al. found that children over the age of eight were more likely to be able to identify Pokémon characters than they were local wildlife. [3] In addition, Ballouard et al. (2011) found that children obtained much of their knowledge of protecting species based on content from the internet. Because of this, students’ ability to identify local species was poor (only 39.9% correct identification), compared to 46.4% for exotic species. The majority of the animals that the children said needed the most protection were charismatic megafauna such as Polar Bears and Giant Pandas. Only 13.3% of the species identified as needing protection were local species. [4] It is clear that young people’s lack of connection to local wildlife is of great concern.
Camera traps can be a powerful tool for engaging learners of all ages in wildlife conservation. They provide a glimpse into the lives of wildlife that many people never see. The images they produce can elicit emotions from the viewer, which can help people connect to the animals. [5] This connection to wildlife is one of that reasons that camera traps are such powerful educational tools. When coupled with inquiry-based education, camera trapping can give students experience in carrying out scientific investigations that may encourage them to pursue advanced degrees in the sciences. [6]
It is essential to involve students at every point in the design process when starting a camera-trap project in the classroom. Students should be involved when determining where the camera traps should be placed and which parameters they want to establish. Having students observe the areas around where the traps are set may lead them to asking comparative questions (i.e., Is a certain species more likely to be present during the daytime or nighttime?) that can be answered through examination of the data collected. Depending on the age of your students and their experience with developing research questions, you may need to provide additional scaffolding or provide students with different options of questions to research. (See the section below about adapting the activity for younger students.)
Engaging in citizen-science projects is another popular means of bringing camera trapping into the classroom. Websites such as eMammal (https://emammal.si.edu/) and Zooniverse (https://www.zooniverse.org/) connect students and teachers with scientists conducting camera-trap research. eMammal provides software for picture identification as well as lesson plans and training on how to set up camera traps (https://emammal.si.edu/). There is even a game (eMammal Lite) that allows students to become more comfortable with identifying animals from actual camera-trap photos. Zooniverse is a citizen-science platform that allows researchers to upload photos for identification by the public. This allows students and teachers to participate in camera-trap studies without the investment of time or money to obtain the data themselves.
There are also opportunities for students to lend the images they capture to larger scientific studies. Images that have been identified by students can be uploaded to eMammal, for example, where they are checked for accuracy, then added to a Smithsonian Institution repository to be used by scientists studying the effects of urban development on mammal species. [7] Students can provide high-quality data at an accuracy level similar to that observed in adult volunteers, [8] making camera trapping a beneficial effort not only for students but for scientists as well.
MOULTRIE DIGITAL GAME CAMERA
How to: “The camera-trap lab”
I begin the lab by having students generate a list of questions that they have about local wildlife. Alternatively, you could also have students complete a KWL chart (Know, Want to Know, Learned chart). This helps to incorporate a student’s prior knowledge and can be revisited to assess what they have learned after completing the investigation. I then introduce how camera traps are used to conduct ecological research and give a short lesson on the parts of a camera trap and how they work. From here, students make a list of animals they predict the cameras will capture. This is a good time to discuss the limitations of camera traps. For example, certain animals (cold-blooded animals) will not trigger the camera because both heat and motion are required, or the camera is not positioned in an area that the animals frequent (e.g., as is the case with arboreal bird species). For homework that night, I have students log on to a project on Zooniverse.org and identify animals from the pictures. I try to choose a project in a similar geographic location to ours, allowing them to observe species like the ones that we can expect to encounter.
The next day, I take the students out to observe the area where we typically place the traps. They walk along the path, making observations about the surroundings, then discuss where the cameras should be placed. On Day Three, we go back out to place the cameras, where they will stay in position for two to three weeks (Lining this up around Spring Break is helpful.) and then return to collect the memory cards. Before the students begin to process the data, I review the images to ensure that everything worked properly. Doing so also gives me a general sense of which animals the students should be recording. I can also ensure that no inappropriate pictures were captured. Luckily, I haven’t had anything problematic to date, but I feel that a quick check provides a good level of insurance just in case. Also, there may be some animal behaviors that younger students may be sensitive to (such as predation) that you will want to know about before displaying to the entire class. I upload all the pictures to a shared Google-Drive folder and assign students to work in pairs to analyze a set of pictures. We then pool our class data into a shared Google Sheet. It is at this point that I have students generate their research questions. I find that doing it after viewing the photos helps them identify patterns and make more informed predictions. In the past, students have asked research questions like “Which camera has more biodiversity, the one with more tree cover, or less tree cover?” “Are deer more active during the day or night?” and “Are raccoons more likely to travel alone or in groups?” Students have also made connections to the temperature and moon phases, which are displayed in the info bar on the pictures. Students then analyze and present their data to the class using graphs and figures.
Modifying for younger students
This exercise can easily be modified to fit the needs of younger students. Providing prompts and additional scaffolding when developing a comparative question is a good start. When reviewing photos, it may be helpful to look at the images together as a class rather than in small groups. I would also suggest setting the traps for shorter periods so that students have fewer pictures to look through. Rather than using Google Sheets to analyze data, keep a class tally going on the board or poster paper. You can use the data to generate graphs as a class or have each student make individual graphs on paper. The activity could be expanded by having the students construct a food web from the animals that were captured on-camera. It’s even possible to integrate Language Arts by having students write a research paper about an animal they find or a creative writing piece centered around the lives and behaviors of those animals.
When it comes to camera trapping, the possibilities are endless. Each year and season brings a new set of students and wildlife into focus. In my experience, camera trapping has a way of captivating students’ attention and curiosity like nothing else and has been an invaluable tool in my teaching. I hope that others will be encouraged to bring camera traps into their classrooms to engage students and turn a new lens on inquiry!
Cate Rigoulot is currently in her sixth year of teaching environmental science to high-school students at Miss Porter’s School in Farmington, Connecticut. Previously, she spent four years teaching high school special-education science in a public charter school in Philadelphia, Pennsylvania, and two years as the garden educator at the Camden Children’s Garden in Camden, New Jersey. She holds a B.S. in Environmental Science, an M.Ed. in Secondary Science Education, and is currently pursuing an M.A. in biology through Project Dragonfly at Miami University in Oxford, Ohio.
Appendix A: Recommended Equipment
Camera Trap & Lock Box
No-glow IR: Browning Trail Cameras Dark Ops Extreme Camera & Lock Box
Low-glow IR: Bushnell Trophy Cam & Lock Box
White flash: Boly White Flash Trail Camera & Lock Box
Cable Lock
Master Lock 6-Foot Python Cable Lock
SD Memory Card
SanDisk 32GB Ultra SDHC UHS-I Memory Card
Lithium Batteries
SD Card Reader
Anker USB SD Memory Card Reader
Appendix B: Next Generation Science Standards Possibly Addressed
|
2-LS4-1. |
|
Make observations of plants and animals to compare the diversity of life in different habitats |
|
5-LS2-1. |
|
Develop a model to describe the movement of matter among plants, animals, decomposers, and the environment. |
|
MS-LS2-1. |
|
Analyze and interpret data to provide evidence for the effects of resource availability on organisms and populations of organisms in an ecosystem. |
|
MS-LS2-2. |
|
Construct an explanation that predicts patterns of interactions among organisms across multiple ecosystems. |
|
HS-LS2-2. |
|
Use mathematical representations to support and revise explanations based on evidence about factors affecting biodiversity and populations in ecosystems of different scales. |
References
[1]Burton, A. C., Neilson, E., Moreira, D., Ladle, A., Steenweg, R., Fisher, J. T., Bayne, E., & Boutin, S. (2015). REVIEW: Wildlife camera trapping: a review and recommendations for linking surveys to ecological processes. Journal of Applied Ecology, 52(3), 675–685. https://doi.org/10.1111/1365-2664.12432
[2]Kolowski, J. M., & Forrester, T. D. (2017). Camera trap placement and the potential for bias due to trails and other features. PLOS ONE, 12(10), e0186679. https://doi.org/10.1371/journal.pone.0186679
[3]Balmford, A., Clegg, L., Coulson, T., & Taylor, J. (2002). Why Conservationists Should Heed Pokémon. Science, 295(5564), 2367-2367. https://doi.org/10.1126/science.295.5564.2367b
[4]Ballouard, J.-M., Brischoux, F., & Bonnet, X. (2011). Children Prioritize Virtual Exotic Biodiversity over Local Biodiversity. PLoS ONE, 6(8), e23152. https://doi.org/10.1371/journal.pone.0023152
[5]Swann, D. E., & Perkins, N. (2014). Camera trapping for animal monitoring and management: a review of applications. In P. Meek & P. Fleming (Eds.), Camera Trapping: Wildlife Management and Research. (pp. 3–11). Collingwood, Australia: CSIRO Publishing.
[6]Edelman, A. J., & Edelman, J. L. (2017). An Inquiry-Based Approach to Engaging Undergraduate Students in On-Campus Conservation Research Using Camera Traps. Southeastern Naturalist, 16(sp10), 58–69. https://doi.org/10.1656/058.016.0sp1009
[7]Schuttler, S., Glenn, D., Belair, C., Hohm, J., Humphries, D., Pasion, D., Dunn, R., & Kays, R. (2017). What’s in Your School Yard? Using Citizen Science Wildlife Cameras to Conduct Authentic Scientific Investigations. Science Scope, 041(01), 63–71. https://doi.org/10.2505/4/ss17_041_01_63
[8]Schuttler, S. G., Sears, R. S., Orendain, I., Khot, R., Rubenstein, D., Rubenstein, N., Dunn, R. R., Baird, E., Kandros, K., O’Brien, T., & Kays, R. (2018). Citizen Science in Schools: Students Collect Valuable Mammal Data for Science, Conservation, and Community Engagement. BioScience, 69(1), 69–79. https://doi.org/10.1093/biosci/biy141